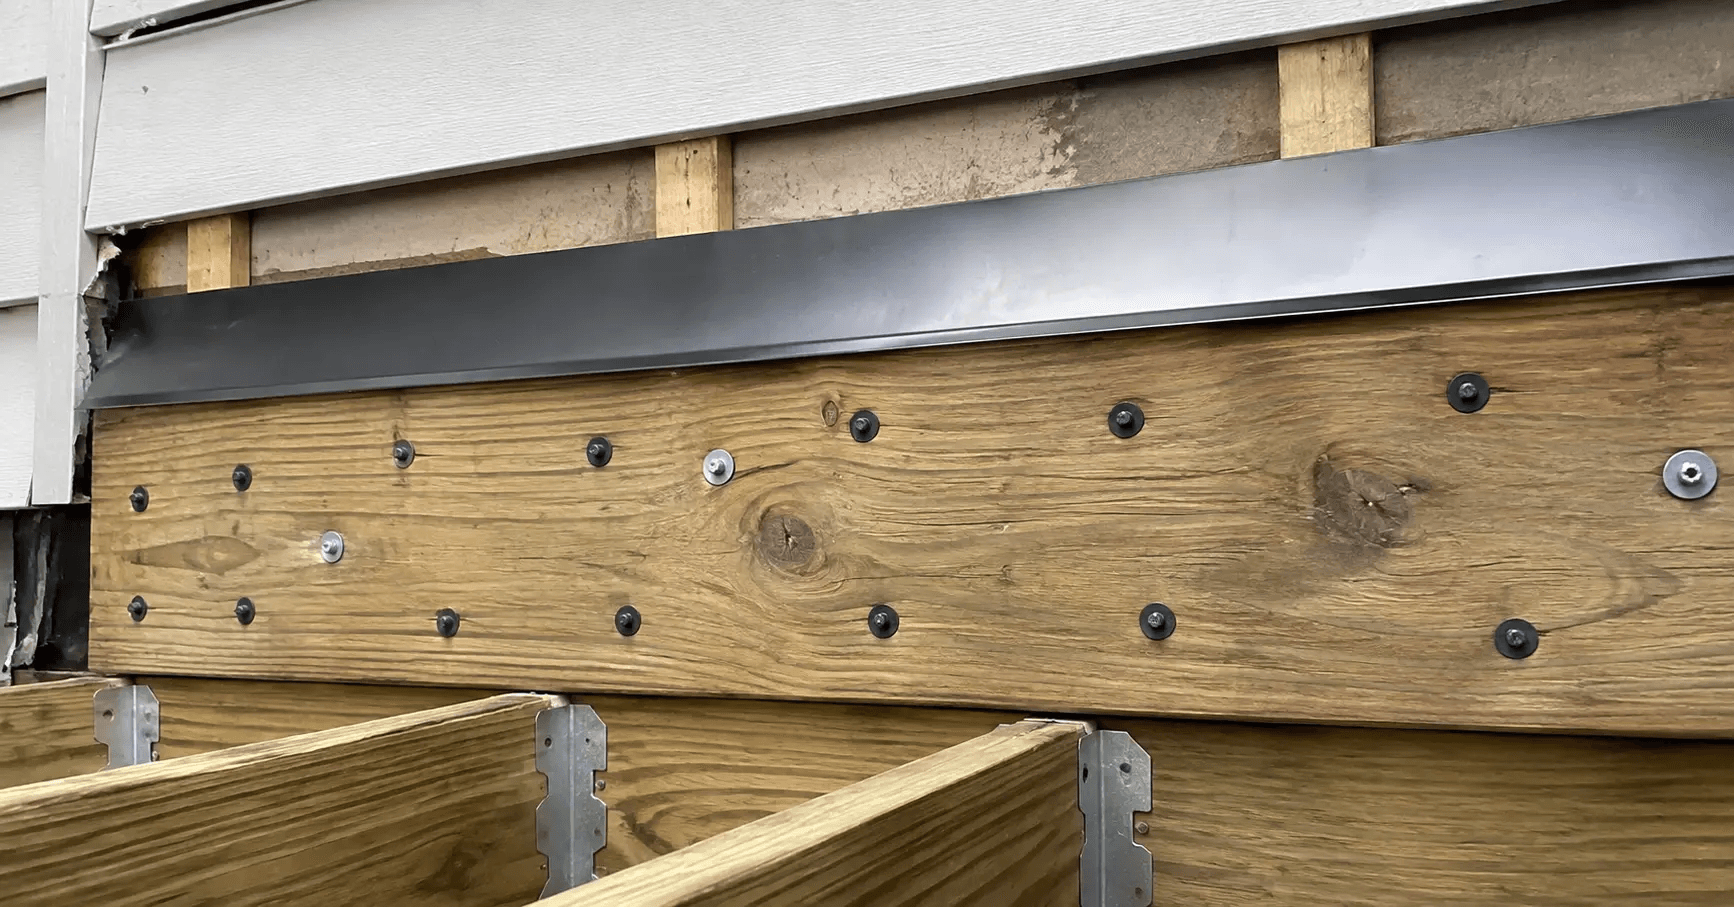
When a deck comes off a house, it is almost never the joists that let go. It is the ledger. The framing stays intact and the whole thing peels away from the wall in one piece, usually with people standing on it.
The other failure mode is slower and just as expensive. Water gets behind the ledger, sits there, freezes, thaws, and rots the rim joist of the house. By the time anyone sees it, the repair is not a deck repair. It is structural work on the building.
Both come down to the same twelve inches of detail. Here is how to get it right.
First, find out what you are attaching to
Before anything else, confirm there is real structure behind the sheathing. A ledger is only as good as what it is bolted to.
What you want is a solid rim joist or band board, properly attached to the floor framing. What you sometimes find instead is a problem.
Brick veneer. Brick veneer is a skin. It carries itself and nothing else. You cannot hang a deck on it. Either get through to structure properly, which is its own detail, or build freestanding.
Cantilevered floor framing. If the wall you are attaching to overhangs the foundation, the rim is sitting on the ends of cantilevered joists. That assembly was not designed to take deck load pulling on it. Freestanding.
Stucco or EIFS. Foam and a coating, with unknown structure behind it. Do not guess.
Old houses with unknown framing. Balloon framing, additions, previous remodels. Open it up and look before you commit.
There is no shame in building freestanding. Add a beam and a row of posts and the whole problem disappears. It costs a bit more in footings and it removes the single most likely failure point on the job. On a house where you cannot verify what is behind the wall, it is the right answer, not the fallback.
Take the siding off
You cannot flash a ledger properly through siding, and you cannot bear a ledger properly on top of it.
Cut the siding back, expose the sheathing, and work from there. Vinyl, clapboard, shingle, whatever it is, it comes off in the ledger zone plus enough above and below to lap the flashing correctly.
A ledger screwed over clapboard is bearing on a wedge shaped gap. The fasteners are in bending instead of straight tension and shear, the ledger is not flat against the wall, and there is no way to get water out. It is the fastest visual tell that a deck was built by someone in a hurry.
Fasteners, and what does not count as one
Ledger attachment is governed by a fastener schedule, not by feel. Size, spacing, staggered pattern, edge distance, and end distance are all specified, and the spacing changes with joist span because a longer span puts more load on the connection.
Pull the actual table from the deck construction guide your building department enforces and follow it. This is not a place to eyeball it.
What does not attach a ledger:
- Nails
- Standard deck screws
- Anything landing only in sheathing
- Lag screws that do not reach full thread penetration into the rim
- Fasteners crowded near the top or bottom edge of the ledger
Through-bolts with washers are the strongest connection when you can get access to the back side. Structural screws rated for ledger attachment are the common choice otherwise, and they need to be the actual rated product, not a screw that looks similar. Lag screws work when installed correctly, which means a properly sized pilot hole and full penetration, driven not hammered.
Everything has to be rated for contact with treated lumber. Hot dipped galvanized or stainless. The wrong coating corrodes from the inside of the connection where nobody will see it until it fails.
The lateral load connection
Separate from the fastener schedule, code generally requires a lateral load connection. These are tension devices that run from the deck framing back into the house floor framing, tying the two together against the deck pulling away.
They are easy to skip because the deck feels solid without them, and they are one of the specific things inspectors look for. Plan the locations before you frame, because retrofitting them means going back into the house floor.
Flashing is where cold climates bite
Every ledger creates a horizontal seam on a wall that was designed to shed water vertically. Your job is to get water past that seam and back out.
In a climate with real winters the stakes go up, because water that gets behind the ledger does not just sit and dry. It freezes, expands, and works the joint open a little more each cycle. And snow piles against the wall right at ledger height, so that zone stays wet far longer than the rest of the house. Add ice damming above and you can get water driven back upward, under laps that would be fine in a rainstorm.
The layering, from the wall out:
Self-adhering membrane on the sheathing behind where the ledger lands, run up the wall and past the ends of the ledger. This is your backup. If everything else leaks, this is what keeps the rim joist dry.
The ledger, fastened per the schedule.
Cap flashing over the top of the ledger, turned up the wall behind the housewrap and siding, and turned out over the ledger face with a drip edge. Water running down the wall hits the flashing and gets directed out over the ledger instead of behind it.
Housewrap and siding lapping over the flashing, never tucked under it. Shingle fashion, every layer overlapping the one below.
Use a flashing material compatible with treated lumber. Modern treated lumber corrodes plain aluminum. Copper, stainless, or a coated product rated for the application.
Do not caulk your way out of a bad lap. Sealant is a supplement to correct layering, never a substitute for it, and it is the first thing to fail.
Leave a drainage gap
Even flashed correctly, a ledger pressed tight to the wall holds water in the joint by capillary action. Stacked washers or purpose made spacers behind the ledger create a gap that lets it drain and dry.
If you do this, the fastener length has to account for the gap so you still get full penetration into the rim, and the schedule may change. Check before you order fasteners, not after.
Common mistakes
Flashing that stops at the ends of the ledger. Water gets in at the ends. Run it past, and detail the ends so water turns out rather than continuing sideways into the wall.
Housewrap lapped the wrong way. Tucking wrap under the flashing instead of over it creates a funnel pointed at your rim joist. It looks tidy and it is backwards.
Attaching to a rim that is already rotten. If you open the wall and find soft wood, that is the job now. Bolting a new deck to compromised framing is worse than not building it.
Ledger too high relative to the door. The deck surface should sit low enough that water and snowmelt do not run back toward the threshold, which means the ledger location is set by the door, not by convenience.
Skipping the inspection. Ledger and flashing get looked at before the decking goes on. Cover it up early and you may be pulling boards.
The short version
- Verify real structure behind the sheathing before committing to a ledger
- Brick veneer, cantilevered floors, and unknown framing mean freestanding
- Remove the siding, never fasten over it
- Follow the fastener schedule for size, spacing, and edge distance
- No nails, no deck screws, nothing landing in sheathing alone
- Install the lateral load connections and plan them before framing
- Membrane behind, cap flashing over, siding lapping outside the flashing
- Use flashing material compatible with treated lumber
- Leave a drainage gap and adjust fastener length for it
- Get it inspected before you cover it
The ledger is maybe two hours of the build. It is also the part that decides whether the deck is still safe in fifteen years and whether the homeowner is repairing their rim joist in eight. Take the siding off and do it properly.
This is the third piece in the sequence, after how deep deck footings need to go in cold climates and what governs joist spacing and span. Footings, framing, and the connection to the house are the three places where a deck either holds up to a New Hampshire winter or does not.